Us four under two birtch trees

Us four under two birtch trees

Friday, 28 June 2019

Roofing

After the projects of the saw mill and brick layer coming and the sauna we finally finally got to start with the actual house project. This meant starting to complete the roof. We did one third of the roofing in December and it took a long time because of the weather, the short and dark days, the figuring out how to do things and also the tiredness from the long building year. But now it is much faster! We thankfully have a carpenter helper who does roofing as a job and another motivated helper who is thinking of being a carpenter so Mick has good help!


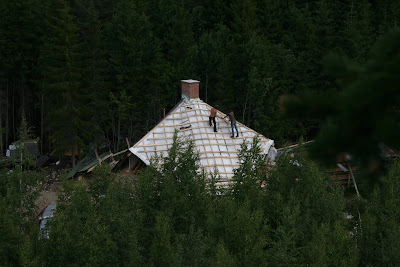
A view from a tree that Mick climbed: The house, roof and lots of trees. The trees in front are mostly birch, in the middle mostly spruce and in the distance pine.


The roof of the house is divided into six sections, three big ones and three smaller sections under the windows. Figuring out all of this roofing a round house has taken a lot of time from Mick and once in a while given him a head ache or sleepless nights but now it is looking good!


The second part of the roof took only seven days and then it had the tins on already. The weather for the roofing has been amazingly good. Almost no rain, warm and hot weather with many windy days to keep the mosquitoes away.


Putting on the last lats.


The third part of the roof took only about five days.
The house still has the plastic cover on the sides because it gives a protection from the weather to the inside of the house. We will leave this plastic on all through the summer because the next project is starting on the walls and it is important to keep the wood and straw bales dry all through the building process. 

The roofing of the smaller sections under the windows began in the middle of this week.

Monday, 24 June 2019

Buying and taking down a Sauna

After the project of the brick laying we went to get a sauna. We would like to have an old building in our new yard and it would also be a nice atmosphere in an old log sauna. We have been looking on the internet for one for a few years now and have gone to see a few but never a suitable one. Now we went to see one about 40 km from our house and it seemed good. The sauna is 100 years old and the log part of the building is 3.5m by 3,5m with a post and beam structure in the rest. The lowest logs were rotten but we thought we could just replace them. Otherwise the building seemed really suitable for us. It has a sauna with a combined washing room and then a separate dressing room/summer room. So we bought it.


Our two German helpers Pirmin and Jackob, and Mick started by taking all the inside paneling boards off that were covering the logs. We tried to take all apart so neatly that we could use them again. After taking off all the boards we were able to see the logs were not at all in as good condition as we were hoping for. From outside they look good but from inside many were rotten, much more than just the lowest ones...


In the deal with the people selling the sauna we did not need to take anything we did not want so we left all the insulation, broken boards, the chimney, the rotten beams and other stuff.


The summer room was not built with logs so we were able to take it down easily. This is what was left after taking the summer room walls away.
After taking the roof off we were able to loosen the logs by hand using a nail bar and then lift the beams onto the ground. They are so old and dry they weigh very little. Now we also really saw the condition and were really disappointed by it. Almost half of them were rotten and so not usable or not worth putting in a building again. This meant to build a new sauna out of these we would need to replace half of them.
So we moaned and groaned and felt stupid and felt we have wasted all this time and energy and money for something that turned out to be something we did not want. In the end we took most of the logs to maybe use in something later (maybe not a sauna) and thankfully we got some of our money back.
This project took us a week all together and fortunately everything fitted in a van and trailer by taking full loads back with us every day we went to work on taking the sauna down.

Wednesday, 12 June 2019

The oven and stove


After the chimney the oven and cooking stove were built. The chimney came right in the middle of our house and the oven beside it. The oven is built in a very particular way so that the smoke circulates around, up and down before it goes out of the chimney. This way all the bricks are heated well and they stay warm for a long time to heat the house. The flue closers for the oven and stove were put near the top of the chimney. When the fire is gone in the oven we close the flue right away so the heat stays in.


When the oven was built our job as a helper for the brick layer was much easier because we did not need to carry the bricks and mortar up to the roof. Mick actually had time to have lunch!


This is the chimney, oven and stove ready from the back side. We will still plaster this all with clay plaster. You can get really beautiful natural colours to add to the clay plaster so it will look really nice when it is ready.
The smoke of the stove goes through the back of the oven to the chimney. This is unusual but possible. We were very lucky to have our friend recommend a good brick layer who has 50 years of experience and  he was very good and quick at his job. Making the oven and stove took a week.


And from the front. The chimney on the right, then the oven center and then the stove on the left. The big hole is where the wood is burnt. When we have burnt all the wood we want that time we push the coals to the back of the oven where there is a space where they fall down on a grate that is in the first hole under the oven. The red coals turn into ashes (while still giving heat) and then those ashes are later pushed down to the second hole where they are emptied (in the winter about once in two months or so). The two smaller holes on the bottom of the oven and on top of the oven door hole are for the chimney sweeping. Because we will still plaster this all the doors are now missing, it will be easier to plaster it without the doors. The big hole where the wood is burnt is where we do baking then when the coals are pushed out of the way. We can make anything there that we want depending on the heat of the oven. By burning more or less wood we can control the temperature. Usually in the winter we heat the oven to 250-300celcius, then we first put in some dinner to bake like pizza or oven vegetables. Then we put in bread or buns and last we might still put a cake or cookies to bake when the oven heat has gone down to around 175celcius.


This is the stove. On top we do all our cooking and heat warm water for washing the dishes, to have a cup of tea etc. On the right the top door is where the wood is burnt and below that is where the ashes fall and are taken away from (maybe once a month or more). The lower door has a vent for giving the fire oxygen and to create a draft for the fire. The bigger door is a small stove for baking food in in the summer when it is too hot to heat the oven. So this way we can make oven dishes even if we don't heat the big oven. The little oven in the stove here heats up automatically without slowing down the heating of the top of the stove. In this too the brick laying was very particular so that the fire goes all around before going out to the chimney. This oven will not become really hot but suitable for some foods like lasagna. I am really looking forwards to being able to bake foods in the summer too.


Some of the doors, chimney sweeping vents and the stove top are bought used. They are all cast iron so they last long! They just needed some cleaning and after that they were wiped with rape seed oil.

Monday, 10 June 2019

The brick layer visits

So this is what we have been doing for the last few weeks: We have been helping the brick layer built us a chimney, oven and stove.
First the brick layer came to visit the place and plan the job. He also gave us a long shopping list for all the stuff we needed to get for the job. We had thought first of using used bricks but in the end we decided to use new ones because of the better quality. In this cold of a climate it is crucial to have an oven that heats the house well (if like in our case it is the only heat source in the house) and also for us a good stove is crucial because it is the only way we can cook. This is why we decided to use new materials and to use a professional to do the work.


So a truck came and brought us 2530 red bricks and 3000kg of mortar. And some fire bricks and other materials. Not cheap!


The chimney is built straight by hanging a plumb bob which is a string line with a weight on it from top and then nailing a board where the line hangs. The brick layer built the chimney along this board (seen in the picture on the right against the chimney)


It was an unusual space for the brick layer to built where the chimney goes out of the roof. There needed to stay minimum 10cm of space all around the chimney for fire safety reasons. This will be later stuffed with rock wool.


When the brick layer got higher doing the chimney the work for us was very heavy. There was no time to spare from making more mortar, bringing it and bricks up onto the roof and also building the scaffolding for the brick layer.


Working on the last 2 meters of the 8.4 meter chimney. The bricks with no holes in them were all built in the house and outside above the frost line the bricks with holes in them are used because they last longer (don't split from frost as easily). The bricks are made in Finland, there still is two brick factories here.


There it is. Building the chimney took about one week.