Us four under two birtch trees

Us four under two birtch trees

Friday 23 November 2018

Firewood project


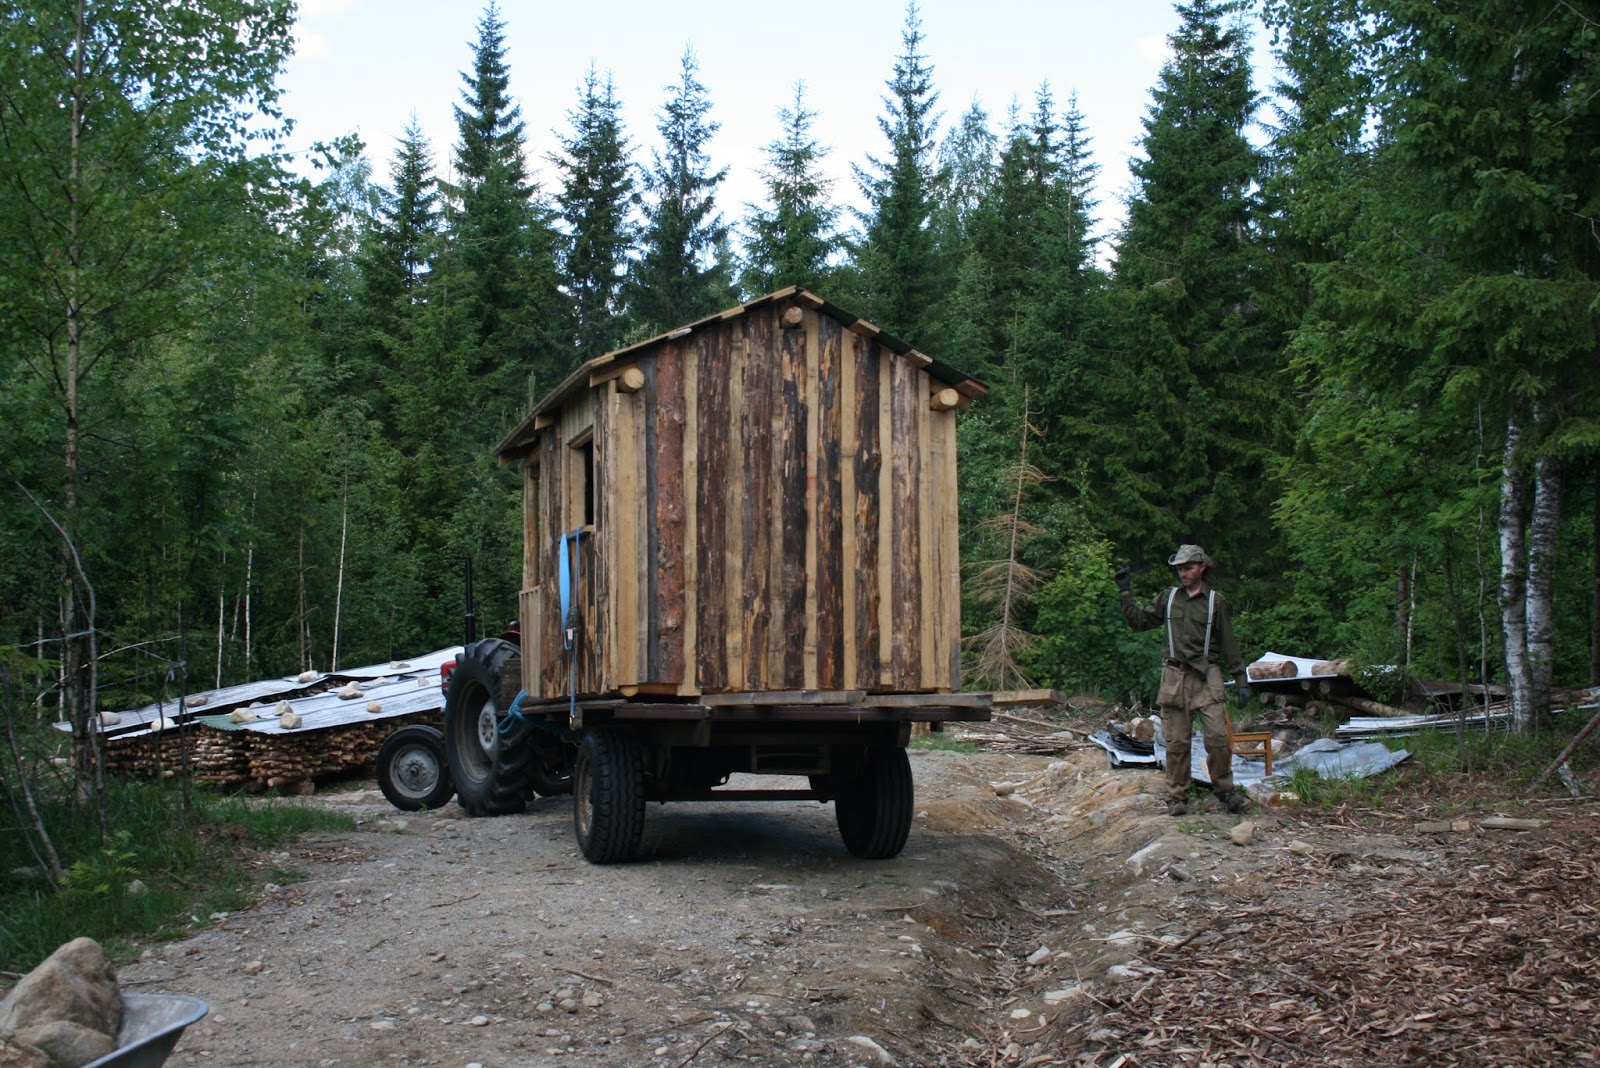
From clearing the forest to become a road we had loads of wood that was too small for using for the building project so it was perfect for firewood. When we were clearing the road last year we cut the wood into the right length and piled beside the road in the forest. One of our projects this summer has been to collect the piles of wood (with a tractor and trailer) to the building site, splitting the fat ones thinner (with a splitter attached to the tractor) and then piling them above the ground to dry properly and finally we covered them with tin.


This is a job we have done the whole summer whenever we had the chance. It has taken a long time and about 10 different helpers and us have done it along the summer. Thank you every one!


For us the most ecological and economical option is to heat with wood so we will have an wood burning oven in the middle of the house. The plan is that this oven will heat the whole house. One can be quite self sufficient for firewood with 5 hectares of land since there is always trees that fall down in the wind or ones that can be thinned out. We also can use my dads fallen trees or thin his forest out from the parts that are close to our land. That we also did last winter cause we weren't sure do we have enough firewood. But now that we have it all splitted and piled we see we have loads! This will be enough for 3-5 years. To get the most heat energy out of firewood the best is to dry it for two to three years so that is why we are doing this all now, before we even have an oven to put it in. 

Sunday 11 November 2018

Building the Conical Roof

 Time to put the roof on our 9 sided structural frame


New tarpaulin position

Originally the load bearing structure of the roof was to be 9 big beams running from the post and beam joints to the centre, where they would be supported on a triangle of centre posts. Our engineer worked out the loads on the roof and because of the long overhang the loads either side of the walls were equal, this made the centre posts unnecessary.
 I was not totally sure about how to build the roof now but thought we will figure it out when the time comes.
 The time eventually came and I was none the wiser, we had a visit from our builder friend Ossi who suggested doing without the 9 big roof beams and making 36 roof "elements", a sort of home made roof truss consisting of a double rafter joined with pieces of plywood. So the roof had a change of design which sorted out allot of technical questions.

Karel making the housing joint for one of the last few rafters

The rafter truss elements are made of a 4.2m sawn pine 5"x2", a 7.2m long 120mm min. diameter (at the wall loading point) roundwood spruce log and four 350mm wide 12mm salvaged plywood pieces fixed at 1.2m centers with 3"nails.
The roundwood elements we cut slots in or made flat surfaces with the chainsaw so the plywood could be fixed to them.

Roundwood rafter with slot and flattened surfaces

Rafter truss fixed in position
 At the centre of the house space needs to be left for the chimney so the rafters are fixed to a ring which we made by glueing and screwing 3 layers of 4"x2"s.

Centre ring

We wanted the roof to look round which means the rafters need to be in different positions on the supporting beam.

Rafter position at post and beam joint

Rafter position at halfway between posts

Checking intermediate rafler housing joint

 We fixed some temporary diagonal braces to stop the whole thing going into a downward spiral!

Lots of wood!

  Now we are working on the 3 dormer roof windows, after them the roof can be sealed up for the fast approaching winter.

Tuesday 2 October 2018

Wind braces


After fitting the post and beams the wind braces need to be done. These stabilize the building providing racking strength, when the wind blows on one side of the house it will try to push over the building, the braces help to stop this. They are fitted at 45 degrees using traditional mortise and tenon joints which are then drilled and pegged. The beams we removed and put on the bench to make the mortises.

Mortise marking template


The mortise marking template is offered up to the flat surfaces which have been left on the post and beam. It is adjusted to suit the length, clamped and then the 2"x4" mortise positions are marked.

Mortise in post

We had to adjust the heights of the mortises as they were meeting in the posts, amateur mistake! And next time I'm working with round wood put centre lines on everything and work to these for all setting out and positioning. I placed the post and beams lining up on the outside edge, this caused a fair bit of difficulty for everything I had to do with them afterwards.

Magic box for marking and cutting the braces

Our magic box is then adjusted to the same length as the mortise template and the brace is placed in the center and fixed in position with loads of big screws. There are marks showing the tenon positions. A hand saw is used to make the cuts with the blade snug against the 45 degree ends. Ben Law's Roundwood Timber Framing book explains all this a bit better. Thats where I got this idea from and it worked out really well, these templates were definitely worth making for making braces with roundwood.


Karel checking the tenon surface for flat


Beam and wind braces ready for fitting


Ben lifting the heavy beam onto the scaffold solo!


Lining up brace tenons with beam mortices


A little encouragement and then its done
Next the joints are drilled and pegged with a 7/8" 22mm pegs made from dried spruce branch.


Wednesday 25 July 2018

A new building to our site

The 21st of June we got a new building on our site, just like that! My dad has build a playhouse for the kids to play in. He built it on his field with Leo`s help. Leo did the hammering of the whole floor and he was happy to help. And quite accurate with his hammering!

To get the playhouse to our site we drove one tractor to the back of it to stop it from falling over and drove the other tractor in front of it with. 

Then bit by bit we lifted it higher until we got the boards from under the house on to the trailer. Then the trailer was tipped and the house was pushed on the trailer. There was nine of us doing it.

Then it was driven to the site and put on six rocks. Later it got a roof on it.


Saturday 21 July 2018

Percolation area / imetyskenttä

We had the digger make our percolation area as well. Because our house will have a dry toilet it is enough for us to have a percolation area that treats the grey water, we wont have any sewage. There comes one pipe from the house, 2 meters under the ground (so it does not freeze) and into a settlement tank. Off the tank there goes two evenly placed pipes with holes in them. So the grey water goes in the settlement tank, leaves any bigger stuff in there (like food scraps from doing the dishes), and continues through the pipe into the ground. The ground was dug and filled with stones. Above the stones and pipe there came a material that protects from any organic matters from going in from above. On that there came fine sand. Off the end of the pipes there goes up two ventilation pipes about 1,5 meters above ground and they have a cap on them. The area is to be kept clear from any big trees and roots, any driving on it or putting heavy stuff on it. 

 Truck bringing stones and sand for the percolation area

 Right low corner: pipe coming from house into the treatment well. In the middle: two pipes under stones. The water spreads evenly along the whole area.

The percolation area had to be placed far enough from the drinking water well so we ended up having to dig through our little forest that was between our house and road. This picture shows a view from the house looking at that little forest and through it you can see the road. 

Wednesday 18 July 2018

Water well / vesikaivo

We had the digger come to our site again (the last time he came was last July when he cleared the site and put the 9 rocks in place for the foundation). Now we wanted a drinking water well and a percolation area to be done. 
We wanted to have the clean water well up hill to our house so that we could have running water with out using electricity. We had planned we would have a hand pump in the house that would start the water to flow and once it is flowing it would keep on coming because of it being up hill from the house. We looked for spots that would likely have water and we also had a diviner come to look for a spot. He found a place where he strongly felt there was water. 
The digger tried from there but it had too big rocks in the way. He also tried digging from another spot but that too had too big rocks. He then ended up digging down hill from the house, in a spot where we were sure there was water. And it did have. Now we have a well 3 meters deep. It is close to the house so maybe we will pump our water at the well and then carry it to the house or use some sort of electric pump to pump it into the house. 

 The well is south from our house, down hill and quite close by. This is an area we would have cleared anyway to let the sun from the south reach the house.

Mick is emptying the well from the dirty water that fills the well at first. He is using a pump that runs with petrol.

Thursday 5 July 2018

All the posts and beams in place!

On the 28th of June Mick and our two helpers Ben and Karel got all the posts and beams in place. It is an exciting point of this summer and one of the big achievements for Mick. 

 Now Mick can see where there needs to be done adjustments.

The job for the rest of the day and the next few days was to put re-inforcement under the floor boards where they meet the posts.

 It is possible quite easily to move the blue tarpaulin to cover or to un-cover the structure. This way things can be safe from the rain but it is possible to work easily when un-covered in good weather.

Wednesday 4 July 2018

Placing a beam

When the first two posts are up a beam can be placed on them. After that after each post there goes a beam in place. In these pictures a second beam is lifted in place so it comes (on the right of the picture) onto the first beam and (on the left of the picture) onto the post.

First the beam is lifted on the high working platform. Off that there has been placed a plank to the post on the left of the picture, Mick is standing on that. The helper on the right, Ben is standing on a ladder and Karel, the helper behind Mick is standing on the working platform. 

The beam is lifted to lie on the other beam (and post under that) already in place.

After that it is lifted across to the other post.

This beam will need some fine shaping and adjusting. There is a small gap between the two beams. 

Tuesday 3 July 2018

Placing a post

The posts need to be lifted in place the joint matching exactly. We are very lucky to have two strong helpers to do this. The right people at the right time! The posts and beams are lifted in place now for the first time. After this Mick will see exactly where there needs to be done some small changes like shaping and cutting.

 Getting ready to lift 

 Mick at the joint directing the beam, two helpers lifting: one at the end and one in the middle

 Both lifters in the middle, Mick directing

 Will it touch the roof structure of the rain cover? No, it fitted. 

Slotting/pushing the beam in place

Saturday 30 June 2018

Making the post and beam timber frame


 Test pieces for half lap joints

First I made many test pieces to try out the best way to make the half lap joint where the horizontal wall beams meet. There is 9 of these joints to make and I wanted to get it right. In the end the simplest one was used.

 Framing bed with beam clamped in place

On the level floor of the house a framing bed made of 3 strong planks is fixed as a template. The 2 long planks correspond to the vertical post positions and another matches the horizontal beam height. All the marking is done on the framing bed and then the cuts are made, first on the posts then the beam. Then the logs are placed back on the bed and checked and readjusted if necessary.

 Post scribed to fit curve of beam

On about half of the joints the top of the post is scribed to make a neat looking junction between the post and beam, it takes over an hour for each scribe, so they are only on the ones seen from the tupa (kitchen/living room)

 Tennons on bottom of wall posts

On the bottom of the posts a 4"x2"x6" long tennon is made, this fits into the mortice joint at the floor beam junctions, which were made last Summer.

 Posts and beam on the framing bed to mark for wind brace positions

The whole lot is then placed on the framing bed for the last time to be marked for the wind brace positions. A flat surface is created on the post and beam to receive the wind brace, these will hopefully work out to be exactly 45 degrees from the side of the post to the underneath of the beam, we will find out when the frame is standing.


"Jenkki saha" cutting the wind brace surfaces.
 
 
Karel the apprentice natural builder

So then after 6 weeks including going to Ireland for my brother Aidan's wedding all the posts and beams are ready and waiting to be put up.